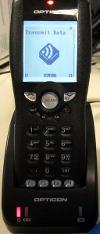
OPH1004
About
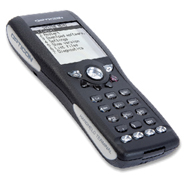
The OPH1004, a rugged, reliable portable laser barcode terminal from Opticon, quickly and accurately scans barcodes and features 16 MB of onboard memory. A batch terminal, the OPH1004 stores data onboard for later transfer via IrDA through a charging cradle (typically CRD1001, sold separately) serially to a host (using plain ASCII, XModem, or Opticon's NetO), and load new OS revisions and applications (using Opticon's Appload). The charging cradle charges a spare battery and is available with a serial, USB, modem or GSM interface, the latter two of which are utilized with Opticon's TCP/IP Library.
The OPN1004 runs a low-level firmware, typically called the "OS", and on top of that runs an application, which essentially drives the behavior of the device and exposes a simple user interface on the OPH1004's LCD screen. The application can be customized in order to change the behavior of the OPH1004, using Opticon's C-Library Kit and the GCC WinArm. This allows end-users to create custom applications modeled around their barcode-driven processes, making the OPH1004 a simple and flexible solution for many business needs.
Downloading Data Files
All of Opticon's Demo Applications for the OPH1004 support downloading of data through Opticon's proprietary protocol called NetO (Net-Oh). As with all communications there are two sides. In this case these are the OPH1004 and the host, a PC. In most situations the terminal is used to collect data by scanning barcodes. This barcode data is then downloaded to the PC for processing.
This section covers setting up and using NetO32, our application for sending and receiving data using the NetO protocol.
NetO32 can be downloaded from the Downloads Table. Simply run the installer after download is complete and follow the prompts. When it is complete, start the NetO32 application on your computer. You will be presented with a main screen and some options menus.
Setting Up the Host
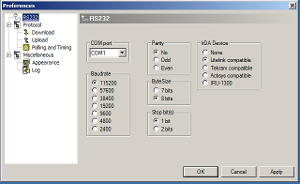
We will need to configure NetO32 to communicate with your device before we can download any data. From the main screen, click 'Tools' and then 'Options'. You can set up NetO32 to communicate using this window. Click 'RS232' from the left hand column. You should see a screen like the one pictured at right.
1.) Choose the COM port where you plugged the device's cradle in.
-
- This is usually COM 1, but may be different if you are using USB rather than RS232. To find your COM port, check Device Manager. Click 'Start', then 'Run', then type 'devmgmt.msc' into the popup. Click 'OK', and look under the 'Ports' section of the window that came up.
2.) Change Baudrate to 115200 3.) Change IrDA Device to 'None'
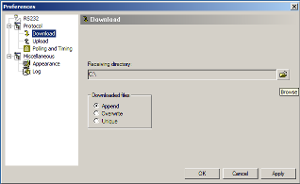
Next, choose 'Download' from the menu at left. You should see a screen like the one pictured at right.
- Click the 'browse' folder icon at right to change where NetO32 will place the text file with your data in it. For example, you could choose to place it on the Desktop. NetO32 will then download your data to a text file on your Desktop. It defaults to calling it "myfile.txt"
- Choose between 'Append', 'Overwrite', and 'Unique' to determine what NetO32 does with downloaded data when you start a download but a file by that same name is already present.
- Choose Append to add the data to the end of the file. This is usually the safest option.
- Choose Overwrite to delete the existing data and replace it with the new data.
- Choose Unique to only Overwrite entries where the data has changed.
When you have completed the above steps, NetO32 is configured to communicate with your OPH-1004. Click 'OK' to return to the Main Screen. From the Main Screen, click 'File', and then 'Save As' to save these settings. If you choose not to save your settings, you will have to configure NetO32 each time you open it. Enter a name for your settings file, like "OPH-1004" or "NetO32 Settings." Every time after this that you open NetO32 you must select 'File', then 'Open' and select this file to load your settings.
Now we are ready to begin downloading data from your OPH-1004. To do this, select 'Protocol' then 'Start' from the main screen.
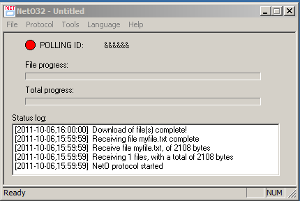
NetO32 is now in 'Polling' mode. You should see the yellow light on the cradle blinking steadily. This means that NetO32 is checking the cradle for a device, and waiting for the right response. When it detects a device on the cradle it will start the download automatically. Multiple downloads can all be done without ever closing NetO32 by simply placing another device in the same cradle after your first device is done downloading.
When you are done using NetO32 simply select 'Protocol', then 'Stop' and NetO32 will stop polling. The application can then be closed.
Starting the Upload from your OPH1004
After NetO32 is in Polling mode (see above) we are ready to download data from the OPH-1004.
- Select 'Transmit Data' from the main menu by using the arrow keys to move up and down and Scan to select an option. The correct option is pictured at right.
-
- The screen that appears should say "Transmit Data NETO Protocol."
- NetO32 will indicate that the data was downloaded by saying "Download Complete." The OPH1004 will then go back to the main menu transmit data screen.
You can find the data file in the folder you chose above.
Loading Firmware
The OPH1004 is basically a mini computer. As such it has an Operating System and runs Applications (one at a time, loading one application erases the previous one). The process for loading either the OS or an Application file is the same for both and so the instructions for either are combined here. Opticon always provides updates to the OS (see the Downloads table at the bottom of the page). Opticon also provides free Applications for use on the OPH1004 though it is also common for independent software vendors or resellers to develop their own software for use on the OPH1004 (this is especially true if the company also provides PC side software). Applications made by Opticon are available at the Downloads table at the bottom of the page (with the exception of software made custom by contract which is provided in other ways to the purchaser). Applications made by a third party must be retrieved from said party.
Download Files
You will need a few files to update your OPH1004. All of these files can be found in the Downloads table below.
- USB Cradle Drivers (necessary only if you are using the USB cable for the cradle)
- Firmware: OS
- Firmware: Application
- Appload
Set Up Your Cradle
A cradle is required to load firmware onto your OPH1004. More information about the CRD1001 cradle can be found here. If you are using USB drivers install them now. Do not connect the cradle to the computer via USB until these drivers are installed. If the cradle was already plugged in simply disconnect and reconnect it. Power must be connected to the cradle at all times (even with a USB connection).
Install and Configure Appload
Appload is a PC application that is used to load firmware on most of Opticon's devices. Once it is installed (by running the installer found in the Downloads table at the bottom of the page) it will launch automatically. Change the options 'Settings' > 'Port' to match the COM port of either the USB or RS232 interface (whichever was used, do not connect both). Change 'Settings' > 'IrDA Adapter/cradle type' to be 'Not Installed'.
Set Up Your OPH1004
The OPH1004 must be placed into a download mode for firmware to install correctly. To do this follow the steps below.
- Power OFF the device
- Press [.] + [1] + [POWER] (this works best by holding [.] and [1] and then tapping [POWER] while you hold the other two down)
- Select option 3 Download Appl
- Return the device to the cradle
Load the Firmware
Select 'File' > 'Download' from the Appload menu and browse to the firmware file you wish to load. Note that if you must upgrade the OS as well as an Application you will need to set up the OPH1004 a second time as well.
Set Time
The OPH1004 has an RTC (Real Time Clock) that can keep track of the time and date. However, since the device does not support Daylight Savings Time it may be necessary from time to time to reset the stored date and time. This can be accomplished two ways. The first way is using the PC program Appload very similarly to loading firmware (described above). The second us manually on the unit itself.
Appload
- Download and Install Appload and Cradle Drivers for the OPH1004's cradle, the CRD1001. Both are available on the downloads section on this page.
- Connect the cradle to the PC and external power (even if you use USB you must also use the supplied AC adapter).
- In Appload select 'Settings' > 'Port' and choose the line similar to 'Opticon OPL/CRD USB Serial Port'.
- In Appload select 'Settings' > 'IrDA Adapter/Cradle type' and choose 'Tekram compatible'
- In Appload select 'Utilities' > 'Send time'. It will only take a few seconds. You will see a, 'ok' popup message in Appload and the OPH1004 will restart.
Manually
- Install a charged battery in the OPH1004.
- Start with the OPH1004 powered OFF.
- hold [.] and [1] and press [POWER]. You should boot into 'SYSTEM MENU'. If not, power off the unit and try again.
- Select 'Settings'
- Select 'Time & Date'
- Use the UP and DOWN (Q1 and Q2 respectively) buttons to move the cursor to different parts of the time and date.
- Special Note: Currently you cannot actually see the cursor when it is on one of the date or time fields and it can only be seen when it is over the Cancel or OK buttons. It will take some practice to get this method correct due to this limitation.
- Second note: When navigating around the date and time the cursor will skip the first two fields of the year. I.e. 2011 is the year and the cursor will skip the 20 and jump directly to the last two digits.
- If you make any mistakes simply press the UP or DOWN arrow to go back to where you were and try again. When you type a new value note that the cursor will automatically advance to the next field.
Application Development
The OPH1004 firmware is split into two levels, an Operating System and an Application. The Operating System Exposes the functions of the hardware to the Application level firmware, and the Application determines how the device behaves. The Operating System is developed and maintained solely by Opticon, however anyone can make an application for the OPH1004 using using Opticon's C-Library Kit and the included GCC WinArm Compiler.
Development Tool SpeedGen
SpeedGen utilizes an interpreter application and a configuration file called a build file to rapidly customize the appearance flow and operation of an OPH1004 data collector. It allows you to tailor your application for your particular workflow. SpeedGen applications consist of screens, each containing data fields, which users fill in by either scanning barcodes, keying data, or a combination of the two. Each data field can also validate user input from one of three data files which are uploaded to the Opticon device.
Getting Started with SpeedGen
To use Speedgen:
- You must install the Speedgen program on your computer.
- Then install the Speedgen interpreter application on your Opticon data collector.
- Once you have done this you can use Speedgen to configure a build file
- And finally use Speedgen to transfer that build file to the device.
- Now you have an application custom tailored for your needs.
Help?
This version of Speedgen comes with a detailed help file rather than a manual. So if you get stuck trying to figure out how to configure your build file then please consult the help file. If you have a specific question or would like some general guidance you are always welcome to write Opticon Technical Support. We can't make the application for you but we are always willing to help.
Downloads
Notice: The downloading and use of any Opticon software implies consent with Opticon's End User License Agreement.
Documents
| Document | Description | Version | Download |
|---|---|---|---|
| OPH1004 Quick Start Guide | This is the quick start guide that comes in the box with the OPH1004. | Download | |
| OPH1004 Application Manual | This is a manual for the standard demo application running on the OPH1004. | Download | |
| Datasheet | Technical Details at a glance. | Download | |
| Universal Menu Book | The Universal Menu Book is a document containing instructions and configuration options for the majority of Opticon's products. Support of the commands in this manual is product specific. A must read for System Integrators. In effect this is the User Manual for all of Opticon's products that do not have a User Manual of their own and a supplement to all others. | December 2009 | Download |
Software
| Software | Description | Version | Download |
|---|---|---|---|
| Appload | Appload Is Opticon's multi-purpose firmware update utility. It is a Windows PC application that provides the capability to download firmware onto most Opticon products. It also contains a versatile terminal interface that allows serial communication to any serial port connected to the PC (be it RS232, USB-VCP or Bluetooth-SPP). Opticon products can be queried and configured in this manner. | EAGV0191 1.91 |
Download |
| NetO32 | A PC application implementing the NetO protocol to transfer files from the PC to the terminal barcode reader. | EGF2001H (2.1.0.0) | Download |
| Firmware: OS | This is the latest Operating System firmware file for the OPH1004. | XBCV0215 | Download |
| Firmware: Application - USA Standard Demo | This is the standard application running on all OPH1004s from our warehouse. It supports a large variety of barcode symbologies (which ones are configurable). Data is stored as a database including the barcode data scanned, the number of times that barcode has been scanned (with optional user quantity input) and the date and time the last entry was updated). Note that when data is viewed on the PC there is significant white space after the barcode data before you will see the quantity and time stamp information due to the nature of the database schema. It would be necessary to scroll to the right to see this extra information. | XFC3092L | Download |
| Firmware: Application - SpeedGen Application Interpreter | This application must be loaded prior to loading any SpeedGen-created files onto the terminal. | XFC35694 | Download |
Drivers
| Drivers | Description | Version | Download |
|---|---|---|---|
| All-In-One PC Drivers | USB-to-serial drivers installer package for 32 and 64-bit versions of Windows XP (32-bit only), Vista 7, 8, 8.1 and 10. This package contains four drivers. The first and fourth drivers are for the Opticon cradles. The second driver is for the OPN200x scanners along with many other Opticon products. The third driver is an ATEN driver for a popular RS232 <-> USB-VCP adapter. You can choose any of the drivers to install on the first screen of the installer program. *Note: Opticon USB Drivers may not install or operate correctly if FIPS (Federal Information Processing Standards) is enabled on your host computer* | 1.615 | Download |
