CRD97xx
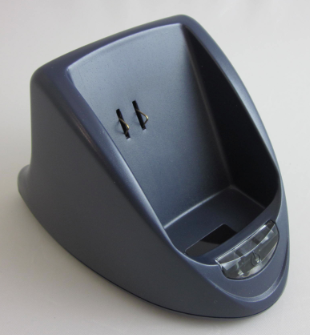
The Opticon CRD-97xx cradles are built as companion devices for the OPL-97xx series of data collection terminals. There are a multiple models to support different usage scenarios. On the whole, however, the basic features of the cradles are the same.
Overview
Power
All CRD-97xx cradles require a separate adapter to provide enough power to allow for charging an OPL-97xx terminal device in all situations (idle, transmitting, etc). Even in the USB configuration this power adapter is required.
Data
The main difference between the various models of the Opticon CRD-97xx is in the type of connection to the PC for data transmission. Details for each connection type follow. It is important to note that some cradles contain multiple data connection types. In all cases only one type should be used at any given time.
USB
On the back panel you will find a square-shaped USB-B plug type. This plug shape is common to modern USB printers. As this connection type is USB-VCP (serial port emulation) it requires USB drivers on the PC side. These drivers can be downloaded from the links in the Downloads section on this page.
RS-232
One the back panel of a cradle that supports RS232 connection types you will find a RJ-45 plug. This is the same connector type used in standard Ethernet internet connections. No drivers are required for this connection type but it does require that your PC have a serial port connection available (third party RS-232 <-> USB adapters are known to work well with these cradles should your PC lack a serial port).
Analog Modem
On the back panel of the CRD-9726 you will find a standard RJ-11 plug commonly used for a landline telephone. These cradles work in much the same way as PC modems. Note that special software for your OPL-97xx terminal would be required for this feature to operate as expected.
GSM Modem
The CRD-9727 contains a GSM modem inside (SIM card required, not included). This allows your OPL-97xx devices to communicate with any internet resource through your carriers data network. Note that special software for your OPL-97xx terminal would be required for this feature to operate as expected.
Baudrate
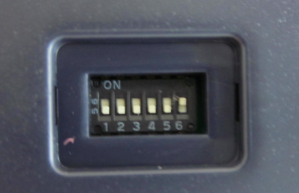
Most CRD-97xx cradles allow the baudrate (the speed at which data is transmitted) to be manually configured via a series of DIP switches on the bottom of the cradle. It is also optional to select an 'auto' baudrate at which point the cradle will retransmit any incoming data at the same baudrate at which it was received. Effectively the cradle becomes a passive device in this mode. Some implementations of the OPL-97xx terminals require specific baudrates manually configured on the cradle. While this is rare it is important to know how to change this setting should the occasion arise.
- Remove DIP Switch Cover
- Adjust switches according to the table found here.
- Replace DIP Switch Cover
Setting up your CRD9723
This section is a step-by-step setup process for our most common of cradles the CRD-9723-RU.
Determine Your Connection Method
Since the CRD9723 can be connected to a PC via USB or RS232 (but not both at once) you need to decide which one you are going to use.
- RS232
- Requires external power (via the provided AC adapter)
- Requires a dedicated RS232 port on your PC. These are increasingly uncommon on many PCs especially laptops so checking if such a connector is present is the first step.
- Does NOT require any drivers
- The COM port number assigned by Windows is hard wired to the physical port and so will never change
- Fastest transmission speeds
- USB
- Required external power (via the provided AC adapter). The USB port on a PC doesn't quite provide enough power to effectively charge the scanner as well as power the cradle.
- Requires only a free USB port
- Does require USB-VCP (Virtual COM Port) drivers. See the Downloads section above.
- Slower transmission speeds. Though it is not usual for USB to be slower than RS232 the USB-VCP configuration of this cradle provides that this method is slightly slower than RS232. In every day usage the difference is negligible.
Install Drivers
If you opted for the USB connection method you will need to download and install the USB Drivers found in the Downloads section above.
Connect Your Cradle
This last step is simply to physically connect the cradle to the PC. As noted above the AC power adapter is always required. Only connect either the RS232 cable or the USB cable but not both.
DIP Switches
| Switch | On | Off |
|---|---|---|
| SW1 | Baudrate* | Baudrate* |
| SW2 | Baudrate* | Baudrate* |
| SW3 | Baudrate* | Baudrate* |
| SW4 | Not Used | Not Used |
| SW5 | Not Used | Not Used |
| SW6 | Auto Baudrate (Controlled by PC settings) |
Manual Baudrate (controlled by dip switches 1-3) |
| Baudrate | SW1 | SW2 | SW3 |
|---|---|---|---|
| 2400 | ON | OFF | OFF |
| 4800 | OFF | ON | OFF |
| 9600 | ON | ON | OFF |
| 19200 | OFF | OFF | ON |
| 38400 | ON | OFF | ON |
| 57600 | OFF | ON | ON |
| 115200 | ON | ON | ON |
Downloads
Notice: The downloading and use of any Opticon software implies consent with Opticon's End User License Agreement.
| Driver | Description | Version | Download |
|---|---|---|---|
| All-In-One PC Drivers | USB-to-serial drivers installer package for 32 and 64-bit versions of Windows XP (32-bit only), Vista 7, 8, 8.1 and 10. This package contains four drivers. The first and fourth drivers are for the Opticon cradles. The second driver is for the OPN200x scanners along with many other Opticon products. The third driver is an ATEN driver for a popular RS232 <-> USB-VCP adapter. You can choose any of the drivers to install on the first screen of the installer program. *Note: Opticon USB Drivers may not install or operate correctly if FIPS (Federal Information Processing Standards) is enabled on your host computer* | 1.615 | Download |


