
OpticonRL
Summary
OpticonRL is an application developed separately for multiple platforms that converts barcode data coming over a serial port into key presses. Since the majority of our products support serial communication in one way or another this can be especially useful. In effect, the barcode data is wedged into whatever application is at the forefront and has text focus, as if it were typed.
OpticonRL for Windows
OpticonRL for Windows is a stand-alone executable, with no installation required.
- Simply download the zipped file here http://ftp.opticonusa.com/OpticonRL/WindowsPC/1.18/OpticonRL_10520I.zip
- Extract the contents to a convenient location like your desktop.
- Open the folder and double click on OpticonRL.exe.
- Select settings.
- Select the COM port of the device you want to use, and select "Toggle on/off".
- Adjust the other settings if needed.
- You have now finished setting up OpticonRL for Windows, so try it!
OpticonRL for Mac OS X
To get setup with OpticonRL for Mac
- Download and install OpticonRL for Mac from this link Download .
- Launch OpticonRL.
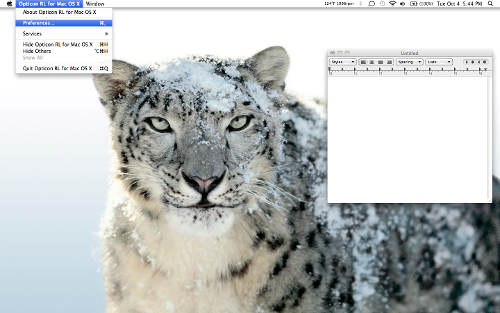
- In the menu bar select "Opticon RL for Mac OS X", then select "Preferences".
 |
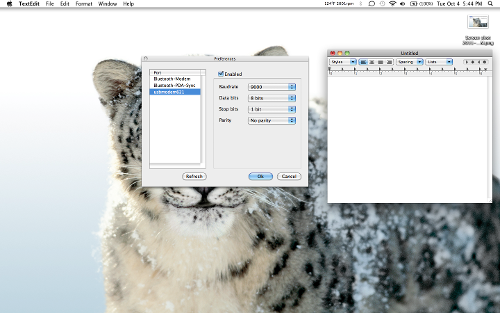
| - In the preferences window select the appropriate device name, and check the "Enable" box.
 |
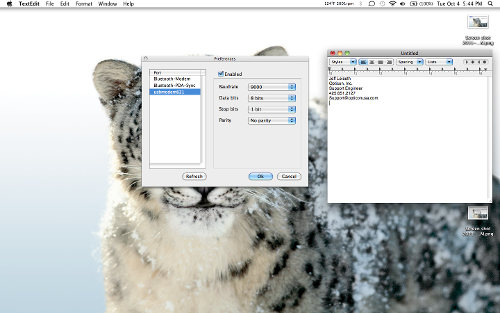
| - Now place your cursor in a text field and scan a barcode. I scanned my business card.
 |
| - If you have any further questions or concerns contact Opticon Technical support using the link on the left.


OpticonRL for Android
Content coming soon!
- Download the zipped file from Opticon's FTP - Download
OpticonRL for Pocket PC
All versions of Windows Mobile PPC use M2694. Current version is 2694.0A or version 1.10.
- Download the zipped file from Opticon FTPhttp://ftp.opticonusa.com/OpticonRL/PocketPC/OpticonRL_EGG2694A.zip
OpticonRL for Palm
- Download the zipped file from Opticon FTPhttp://ftp.opticonusa.com/OpticonRL/Palm/OpticonRL_Palm_v292709.zip
OpticonRL for BlackBerry
Content coming soon! Please note that you should use the version of BlackBerry Desktop Manager that is appropriate for your BB OS.
BlackBerry OS version 4.2.1 or below
- Download the zipped file from Opticon FTPhttp://ftp.opticonusa.com/OpticonRL/Blackberry/OS_4.2.1-/OpticonRL%20EGIS0041.zip
BlackBerry OS version 4.2.1 to 4.5
- Download the zipped file from Opticon FTPhttp://ftp.opticonusa.com/OpticonRL/Blackberry/OS_4.2.1+/OpticonRL%20EGIS27987.zip
BlackBerry OS version 4.6 or above
- Download the zipped file from Opticon FTPhttp://ftp.opticonusa.com/OpticonRL/Blackberry/OS_4.6+/OpticonRL%20EGIS0042.zip
This application will work on BlackBerry devices running OS version 4.6 and higher.
BlackBerry OS version 5.0 or above
- Download the zipped file from Opticon FTPhttp://ftp.opticonusa.com/Downloads/OpticonRL%20for%20Blackberry%20EGIS004x.zip
This application will work on BlackBerry devices running OS version 5.0 and higher. EGIS0043 supports OS 5.0 and later plus new features were added (auto connect at OpticonRL start up, vibration after receiving barcode, and paring from inside of OpticonRL).
Tested devices (EGIS0043) testing can be done on other devices upon request.
9630 tour
9300 curve
9330 curve
9650 Bold
9780 Bold
9800 Torch  (Touch screen is not implemented but it works with trackpad )
Install OpticonRL
- Download ALX and COD files from Opticon FTPhttp://ftp.opticonusa.com/OpticonRL/Blackberry/OS_4.6+/
- Launch the Desktop manager, click on Application Loader, then click the Start button under Add / Remove :Applications. Click on Browse button and navigate to the OpticonRL ALX file. Press Next and Finish and after a while OpticonRL will be loaded onto your device.
Barcode Scanner Software
- Please make sure that you have the newest versions of your device’s firmware installed on your device (both OS and application). The latest software can be found and downloaded from Opticon’s Tech Support web site.http://www.opticonusa.com/solutions/tech-support
Setting Permissions
- OS version 5.0
- 1. On your BlackBerry, select Options > Applications > OpticonRL > Edit Permissions. Make sure Connections and Interactions are set to ‘Allow’.
- 2. Save the changes.
- OS version 4.6
- On your BlackBerry, select Options > Security Options > Application Permissions > OpticonRL > Edit Permissions. Make sure Connections and Interactions are set to ‘Allow’.
- Save the changes.
Setting barcode scanner in SPP mode
- The barcode scanner needs to be set to SPP mode before you start the pairing process.
- OPN-2002
- Scan the barcode at below to choose Bluetooth-SPP mode. (Scanning this barcode will also set the scanner’s COM port to COM2 (necessary for pairing and communication with the BlackBerry) and PIN code to ‘0000’)
- OPL-9712/OPL-9724/OPL-2724
- These devices are already in SPP mode, but need their COM port changed to COM2, and their PIN code set, as described below
Selecting COM port on barcode scanner (OPL-9712/OPL-9724/OPL-2724 only)
- Select COM port on a scanner with an LCD screen
- Go to scanner’s OS system menu by pressing Q1, Trigger, and Q2 simultaneously (the three buttons immediately below the LCD), and select BLT com port
- Select COM2
- OPL-2724
- Scan the barcode below to set COM2
Selecting PIN code on barcode scanner (OPL-9712/OPL-9724/OPL2724 only)
- OPN-9712/OPL-9724
- Go to scanner’s OS system menu by pressing Q1, Trigger, and Q2 simultaneously (the three buttons immediately below the LCD), and select Input PINcode
- Enter four digit numeric code
- OPL-2724
- Scan the barcode at below to set PIN code to 0000
Pairing with Opticon Barcode Scanner
- 1. Make the barcode scanner discoverable.
-
- OPN-2002:
-
- Hold the Clear/Function key on the OPN2002 for five seconds until it beeps and LED begins flashing blue.
-
- OPL-9712/OPL-9724:
-
- Select Input address on OS System menu
- Select “Discovery” to set Bluetooth address on barcode scanner
- Select your BlackBerry device using 2=down key.
- Select Tr=sel key
- Select Restart on OS system menu, and select Q2= Real Time on Data Mode menu
- Select Scan labels
- Select Q2= SLAVE on MASTER/SLAVE menu
- Note: if no MASTER/SLAVE menu on step 3, go to System menu > Bluetooth > Master/Slave
-
- OPL-2724:
-
- Scan the barcodes below to set “trigger to make connectable and discoverable” (makes pressing and holding the trigger toggle the OPL2724’s discoverable and connectable modes)
- Scan the barcodes below to set the “trigger to connect time” to five seconds (sets the time you have to press and hold the trigger to make the OPL2724 discoverable and/or connectable)
- Hold the trigger on the OPL-2724 for five seconds until it beeps and its LED begins flashing blue.
-
- OPN-2002:
-
- 2. On BlackBerry, select Options > Bluetooth > Add Device > Search.
- 3. On the BlackBerry, select the discovered Opticon barcode scanner to pair to from the list.
- 4. On the BlackBerry, enter the numeric passkey if required.
-
- OPN-2002/OPL-2724:
- PIN code is '0000'
- OPL-9712/OPL-9724:
- Enter the PIN code you selected when inputting the OPL’s PIN code through the OS system menu, described above
- OPN-2002/OPL-2724:
-
- 5. The scanner should appear on the Paired Devices list on the BlackBerry. Launch OpticonRL on BlackBerry, and make sure the device appears in the paired devices list.
Initiate the Connection from BlackBerry to a Previously Paired Device
-
- On the BlackBerry, launch OpticonRL.
- Make the barcode scanner discoverable.
- From OpticonRL’s menu, select the device to connect to.
- OpticonRL is meant to run in the background after the connection is established, so that it can “wedge” barcode data into other applications. Switch to another application and start scanning barcodes!
Initiate the Connection from a Previously Paired Barcode Scanner
- Note: Make sure that the BlackBerry is discoverable. On the BlackBerry, select Options > Bluetooth, and make sure that the Discoverable field is set to 'Yes'.
- Launch OpticonRL on the BlackBerry device, and select “Discoverable”.
- Connect to the BlackBerry from the barcode scanner.
-
- OPN-2002:Hold the Scan Key on the device for five seconds
- Note: Make sure OPN is paired initially.
- OPL-9712/OPL-9724:Select restart on OS system menu, select Q2= Real time, select Scan Labels, and select MASTER mode
- OPL-2724:
-
- Scan the barcodes below to set trigger to connect.
- Scan the barcodes below to set trigger press-and-hold time to five seconds to connect
- Hold trigger five seconds to connect
-
- OPN-2002:Hold the Scan Key on the device for five seconds
- 3. On the BlackBerry, check ‘Don’t ask this again’ and select Yes.
- 4. OpticonRL is meant to run in the background after the connection is established, so that it can “wedge” barcode data into other applications. Switch to another application and start scanning barcodes!
-
- Note: Having OpticonRL constantly listen for incoming connections can drain the battery faster than normal. Choosing “Disable discoverable” is recommended when you’re not actively scanning barcodes.
-
Auto Reconnect option
-
-
- This option is for MASTER mode (the BlackBerry initiates the connection).
- The Auto Reconnect option causes the BlackBerry to automatically reconnect to the barcode scanner when the connection is broken. The default setting for first time use is for this option to be enabled.
- Not all barcode devices support Auto reconnection. Currently only the OPN2002 supports the auto reconnection option.
-
Software Development
Since Bluetooth Serial Port data requires an application present on the host device to receive the incoming data Opticon developed it's OpticonRL application. OpticonRL intercepts the serial data and injects it at the cursor. In some cases an application developer may wish to have direct control of the serial data and replace OpticonRL. This section contains a few hints and tips for duplicating the functionality of OpticonRL within your own application.
Android
- The Android UI is not thread safe, so all connection handles have to be under the thread and the Handler needs to be used to talk to the UI.
- OpticonRL is similar to Google's example. As a starting point we recommend using this example to see if the device can be connected.
<Android-sdk>/samples/android-7/BluetoothChat
- If you have a resource busy problem it might be caused by an incorrect UUID. UUIDs do change with different Android devices. Please try several different UUIDs such as:
- "00001101-0000-1000-8000-00805F9B34FB"
- "fa87c0d0-afac-11de-8a39-0800200c9a66"
Code Examples
- The Google example above does not address reconnections. An example of this is below.
Disconnections
Once the device is connected, start the ConnectedThread to begin managing a Bluetooth connection.
public synchronized void connected(BluetoothSocket socket, BluetoothDevice device) {

        // Cancel the thread that completed the connection
        if (mConnectThread != null) {
            mConnectThread.cancel();
            mConnectThread = null;
        }

        // Cancel any thread currently running a connection
        if (mConnectedThread != null) {
            mConnectedThread.cancel();
            mConnectedThread = null;
        }

        // Cancel the accept thread because we only want to connect to one device
        if (mAcceptThread != null) {
            mAcceptThread.cancel();
            mAcceptThread = null;
        }

        // Start the thread to manage the connection and perform transmissions
        mConnectedThread = new ConnectedThread(socket);
        mConnectedThread.start();

        // Send the name of the connected device back to the UI Activity
        Message msg = mHandler.obtainMessage(OpticonRL.MESSAGE_DEVICE_NAME);
        Bundle bundle = new Bundle();
        bundle.putString(OpticonRL.DEVICE_NAME, device.getName());
        msg.setData(bundle);
        mHandler.sendMessage(msg);

        setState(STATE_CONNECTED);
Implement ConnectedThread - When the device is disconnected, IOExceptin is thrown in while roop in run function. Notify to the UI Activity.
/*
 *
 * This thread runs during a connection with a remote device.
 * It handles all incoming and outgoing transmissions.
 *
 */
    public class ConnectedThread extends Thread {
        private final BluetoothSocket mmSocket;
        private final InputStream mmInStream;

        public ConnectedThread(BluetoothSocket socket) {
            Log.d(TAG, "create ConnectedThread");
            mmSocket = socket;
            InputStream tmpIn = null;

            // Get the BluetoothSocket input and output streams
            try {
                tmpIn = socket.getInputStream();
            } catch (IOException e) {
                Log.e(TAG, "temp sockets not created", e);
            }
            mmInStream = tmpIn;
        }
        public void run() {
            Log.i(TAG, "BEGIN mConnectedThread");
            byte[] buffer = new byte[1024];
            int bytes;

            // Keep listening to the InputStream while connected
            while (true) {
                try {

                    // Read from the InputStream
                    bytes = mmInStream.read(buffer);

                    // Send the obtained bytes to the UI Activity
                    mHandler.obtainMessage(OpticonRL.MESSAGE_READ, bytes, -1,    buffer).sendToTarget();

                } catch (IOException e) {
                    Log.e(TAG, "disconnected", e);
                    // Connection is LOST (disconnected from device)
                    break;
                }
            }
        }
        public void cancel() {
            try {
                mmSocket.close();
            } catch (IOException e) {
            	Log.e(TAG, "ConnectedThread close()", e);
            }
        }
    }
Reconnections
Override AsyncTask and make an application run background.
private class Reconnect extends AsyncTask<BluetoothDevice, Void, Boolean > {
    	BluetoothService mService = null;
    	boolean stopReconnect = false;

    	public Reconnect(BluetoothService mService){
    		this.mService = mService;
    	}

    	@Override
    	protected void onCancelled() {

    	}

	@Override
	protected Boolean doInBackground(BluetoothDevice... arg0) {

    	// if device is not connected, create timer and keep connecting for certain time.

	}

}
Excecute AsyncTask when device was disconnected.
	private Reconnect task = new Reconnect(mService);
	task.execute(device);