
OPL97xxtest
Setup
Follow these directions for first time setup, software installation, and configuration for transferring data from the OPL9728.
Setting up the Host
Collect Materials
- You will need the following items.
- A windows computer
- An OPL9728
- A CRD9723 cradle
- A 32-00601-00 power adapter for the CRD9723
- Either a USB-A to USB-B cable or an Opticon RS232 cable
Assembly
- Connect the 32-00606-00 power adapter to a power outlet.
- Connect the 32-00606-00 power adapter to the CRD9723.
- Connect the communication cable to the CRD9723.
- Connect the communication cable to the computer.
- If using USB then you can plug the USB cable in to any active USB port on the computer.
- If using RS232 your computer must have a DB9 (nine pin RS232) connector on the back.
Software Installation
In this section we step through installing both Opticon's USB drivers and NetO32.
Installing USB Drivers
If you are using RS232 please skip to Installing NetO32. Opticon's USB drivers need to be installed for the cradle to be properly via USB.
- Download the USB drivers from the Driver Downloads section.
- Open the zip file by double clicking on it.
- Launch the installer by double clicking on it.
- Follow the prompts to finish the installation.
Installing NetO32
The OPL9728 uses a piece of windows software called NetO32 to save the data file to the computer. To install NetO32 follow the steps below.
- Download NetO32 from the Software Downloads section.
- Open the zip file by double clicking on it.
- Launch the installer by double clicking on it.
- Follow the prompts to finish the installation.
Configuring NetO32
- Select 'Tools' > 'Options'
- Choose RS232 from the menu at left
- Choose the COM port for your cradle (COM 1 if using RS232, check Device Manager for USB ['Start' > 'Run' > 'devmgmt.msc' > click 'OK' and look under the 'Ports' section])
- Change Baudrate to 115200
- Change IrDA Device to 'None'
- Choose 'Download' from the menu at left
- Click the 'browse' folder icon at right to change the destination folder of the file once you have downloaded it.
- Choose between 'Append', 'Overwrite', and 'Unique' to determine what happens when you download a data file but a file by that same name is already present.
- Click 'OK'
- Choose RS232 from the menu at left
- Select 'File' > 'Save As'
- Choose a file name appropriate for you (such as your name or your company's name) to save the settings you just changed.
- Now every time after this that you open NetO32 you must select 'File' > 'Open' and choose this file to load your settings.
- Select 'Protocol' > 'Start'
NetO32 is now in 'Polling' mode. Note that you should see the yellow light on the cradle blinking steadily. This means it will sit here indefinitely sending queries to the cradle and waiting for the right response to start a download. Multiple downloads can all be done without ever closing NetO32. When you are done using NetO32 simply select 'Protocol' > 'Stop' and NetO32 will discontinue polling mode. The application can then be closed.
Starting the Upload from your OPL9728
After NetO32 is in Polling mode (see above) follow these steps. Note that you should see the yellow light on the cradle blinking steadily. This means it will sit here indefinitely sending queries to the cradle and waiting for the right response to start a download. Multiple downloads can all be done without ever closing NetO32. When you are done using NetO32 simply select 'Protocol' > 'Stop' and NetO32 will discontinue polling mode. The application can then be closed.
- For the purposes of the inital test, please scan some barcodes if you have not yet done so.
- Place the OPL9728 nose down in the cradle.
- The NetO32 status log will indicate that the data was downloaded.
- Your Data File is now on the PC in the folder specified previously.
Loading Firmware
Follow the directions above for Setting up the Host.
Software Installation
Follow the Directions above for Installing USB Drivers
Installing Appload
- Appload is Opticon's multi-purpose utility for installing firmware onto devices such as the OPL9723. To install Appload follow the steps below.
- Download Appload from the Downloads Software Section.
- Open the zip file by double clicking on it.
- Launch the installer by double clicking on it.
- Follow the prompts to finish the installation.
Configuring Appload
This section outlines how to configure Appload to communicate with the OPL9723. Appload is a PC application used to load firmware on most of Opticon's products.
Select COM Port
- Select Settings
- Select Port
- Select the appropriate Port number so that it will match the COM port of either the USB or RS232 interface (whichever was used).
- If you are using an RS232 interface the physical serial port is usually assigned COM1 by Windows so if you are using an RS232 interface this is likely your COM port number.
- If you are using a USB interface then select the COM port will usually be a number between 2 and 250. The cradle should identify itself as an 'Opticon OPL/CRD USB Serial Port'.
Set IrDA type
- Select Settings
- Select IrDA Adapter/cradle type
- Select Not Installed
Download Firmware
You will need to download and unzip the appropriate firmware file for the action you wish to perform from the Software Downloads section.
Loading the Firmware
OPL9723 Firmware Setup
- The OPL9723 must be placed into a download mode for firmware to install correctly. To do this follow the steps below.
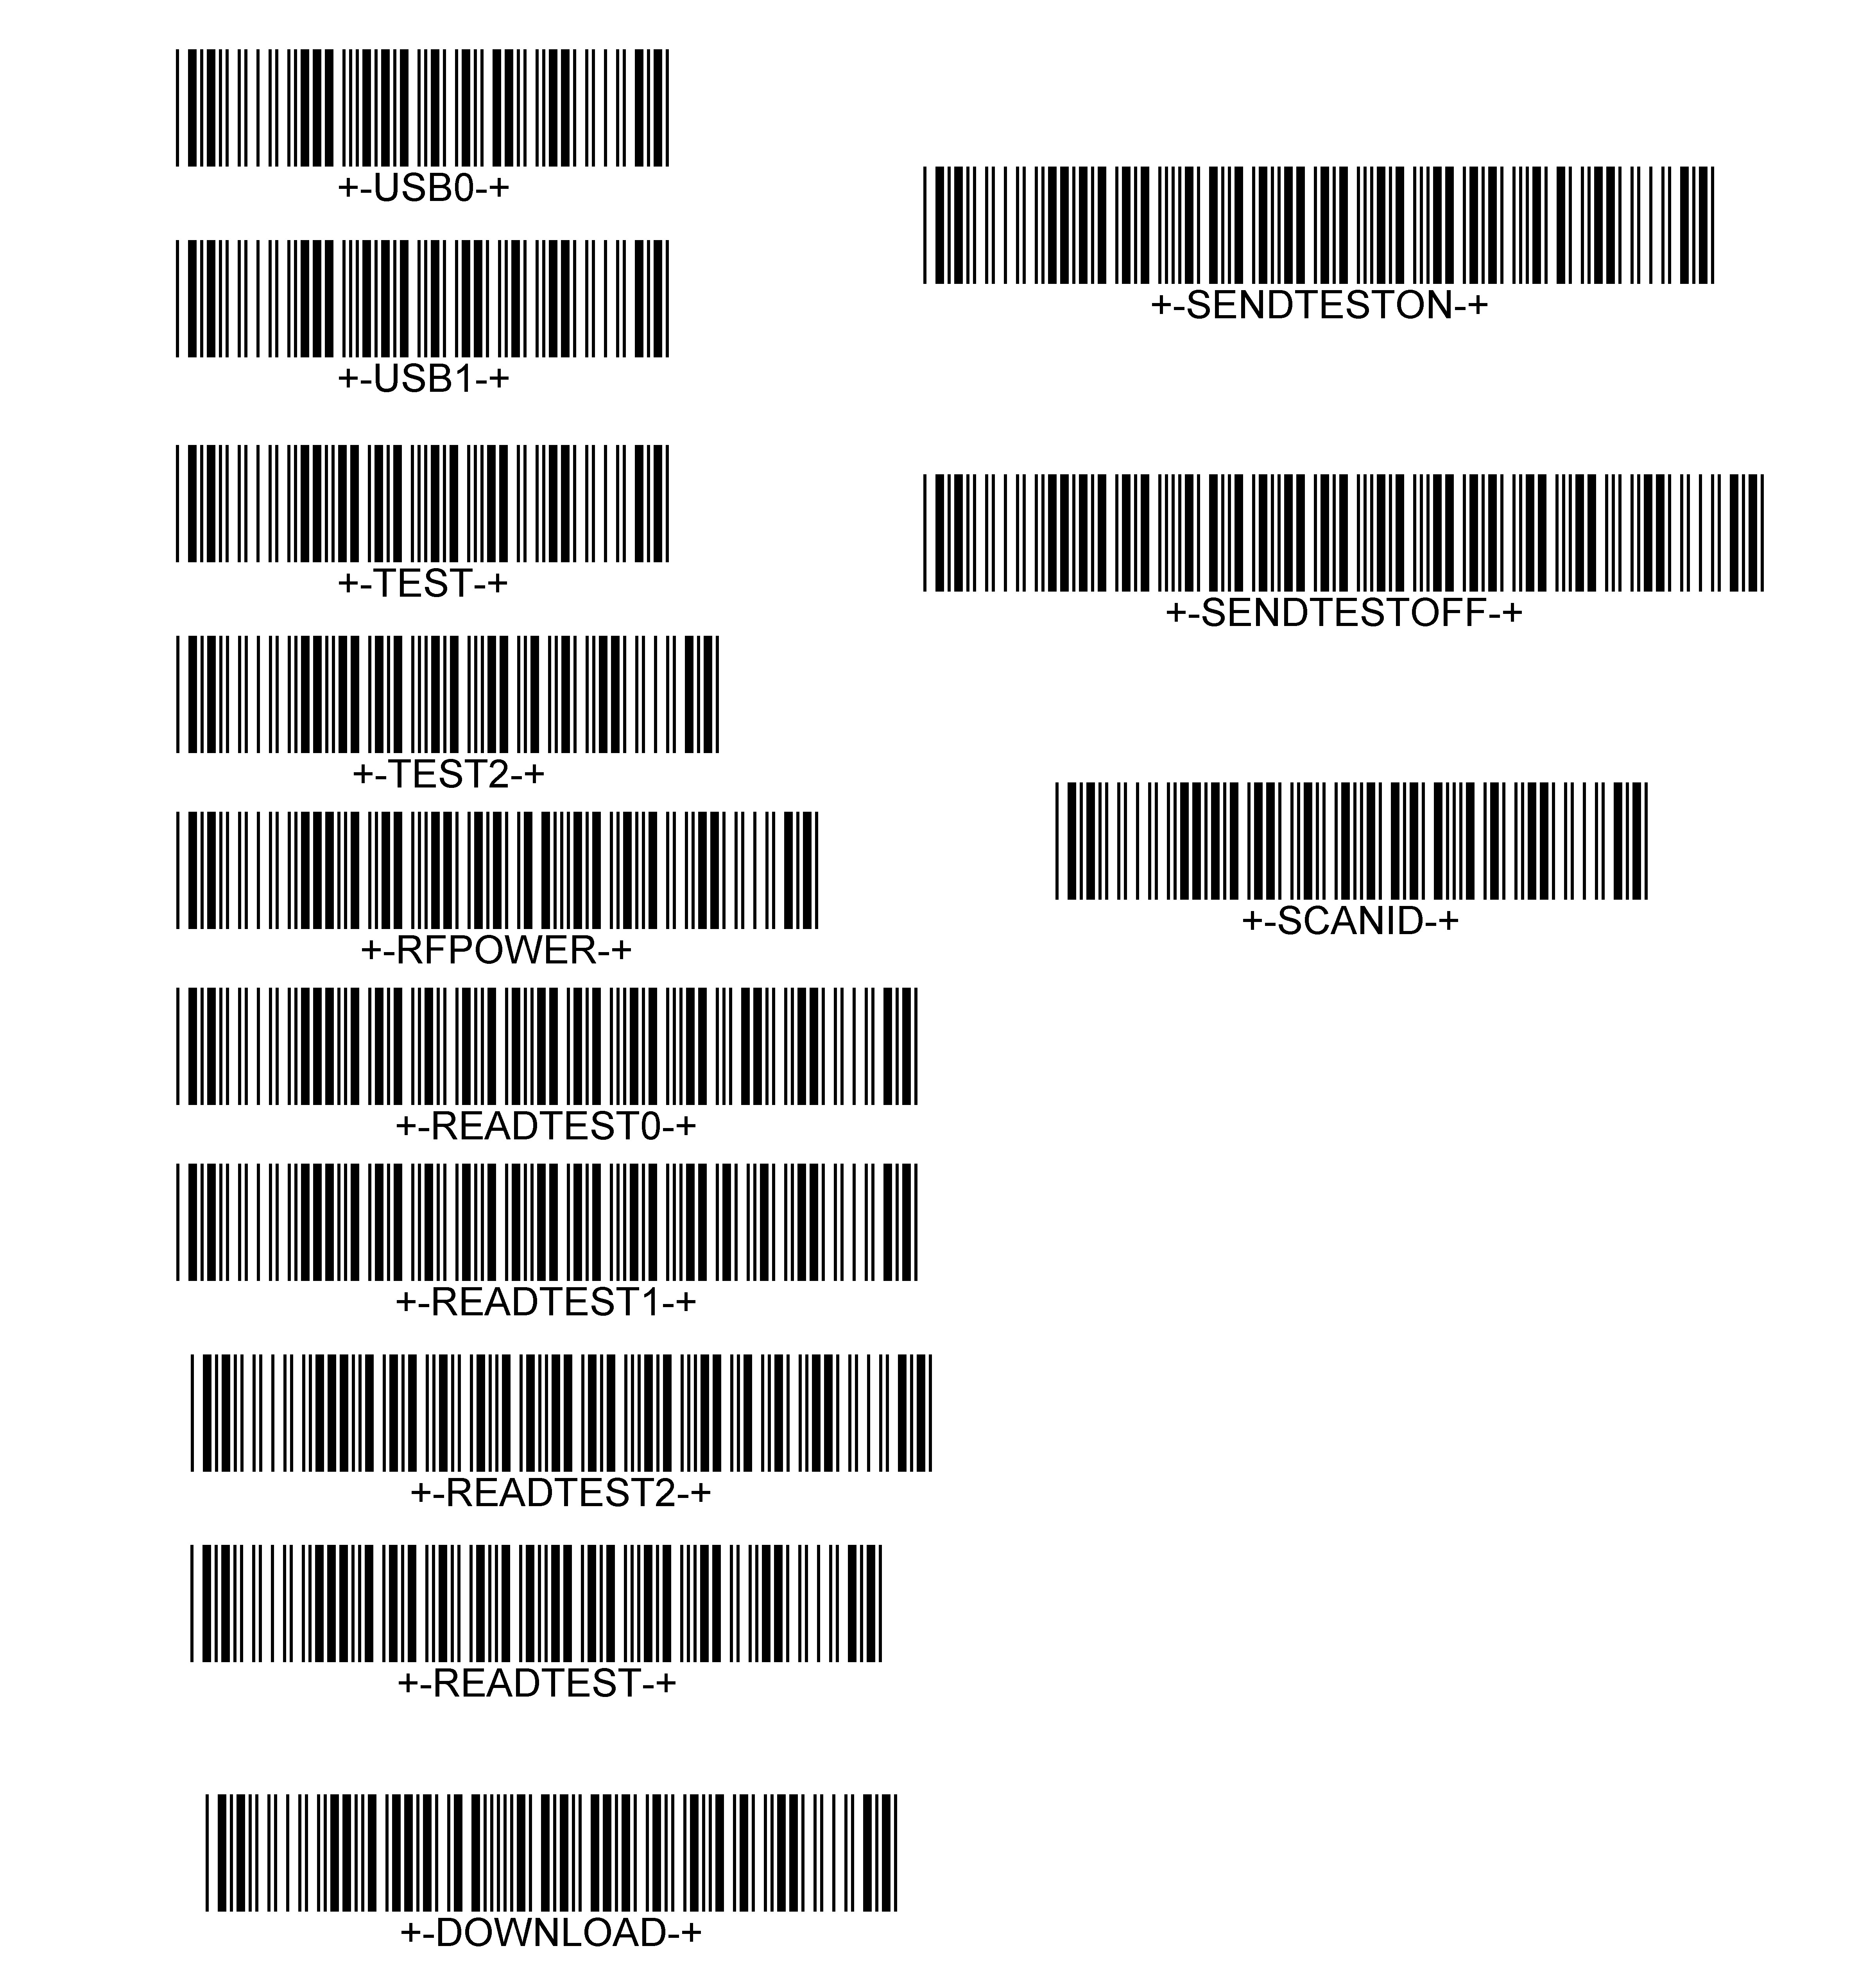
- Print this barcode sheet.
- Scan the +-DOWNLOAD-+ at the bottom of the sheet. The unit should beep and show a flashing red LED.
- Return the device to the cradle
Load the Firmware
- Drag the OS file onto Appload to program the OS or choose 'File' > 'Download' and navigate to the OS firmware file.
- After the OS is finished programming, you can immediately drag the Application file onto Appload or choose 'File' > 'Download' and navigate to the OS firmware file to load the application.
- After the application finishes, the unit will beep annoyingly.
- Scan the serial number label on the box your device came in to stop the beeping and program the id.
Downloads
Notice: The downloading and use of any Opticon software implies consent with Opticon's End User License Agreement.
Documents
| Document | Description | Version | Download |
|---|---|---|---|
| User Manual: Application LFBP0511 | This is the User Manual for the USA Standard Demo (pre-loaded from our warehouse on all OPL9728 units). | Download | |
| Splash Screen.PDF | As referenced on page 13 of the above application manual, this document provides the barcodes necessary for utilizing the splash screen options in system menu. | Download | |
| Universal Menu Book | The Universal Menu Book is a document containing instructions and configuration options for the majority of Opticon's products. Support of the commands in this manual is product specific. A must read for System Integrators. In effect this is the User Manual for all of Opticon's products that do not have a User Manual of their own and a supplement to all others. | December 2009 | Download |
Software
| Software | Description | Version | Download |
|---|---|---|---|
| Appload | Appload Is Opticon's multi-purpose firmware update utility. It is a Windows PC application that provides the capability to download firmware onto most Opticon products. It also contains a versatile terminal interface that allows serial communication to any serial port connected to the PC (be it RS232, USB-VCP or Bluetooth-SPP). Opticon products can be queried and configured in this manner. | EAGV0183 1.83 |
Download |
| NetO32 | A PC application implementing the NetO protocol to transfer files from the PC to the terminal barcode reader. | EGF2001H (2.1.0.0) | Download |
| Firmware: OS | This is the latest Operating System firmware file for the {{{prodName}}}. | Download | |
| Firmware: Application - USA Standard Demo | This is the standard application running on all {{{prodName}}}s from our warehouse. It supports a large variety of barcode symbologies (which ones are configurable). Data is stored as a database including the barcode data scanned, the number of times that barcode has been scanned (with optional user quantity input) and the date and time the last entry was updated). Note that when data is viewed on the PC there is significant white space after the barcode data before you will see the quantity and time stamp information due to the nature of the database schema. It would be necessary to scroll to the right to see this extra information. | Download | |
| Firmware: Application - USA Standard Demo Variant | This standard demo differs from the standard only in the way data is stored on the unit. Rather than barcode data, quantity and time stamps stored as a database this variant stores only the barcode data scanned in the order it was scanned. | Download | |
| Firmware: Application - USA Standard Demo Variant | This standard demo differs from the standard only in the way data is stored on the unit. Rather than barcode data, quantity and time stamps stored as a database this variant stores only the barcode data scanned in the order it was scanned but also includes the date and time stamps of each scan. | Download | |
| Firmware: Application - EU Standard Demo | Similar to the USA standard demo this version differs primarily in the default transmission settings (raw ASCII transmission and 19200 baudrate) | Download | |
| Firmware: Application - Viewer | This small application simply allows the scanning of any supported barcode with the ability to view the encoded data on the screen. Changing options via Universal Menu Book commands is supported. | Download | |
| Firmware: Application - Eraser | This tiny application serves simply as a utility to remove any data files that may exist on a unit. | Download |
Drivers
| Description | Version | Download | |
|---|---|---|---|
| All-In-One PC Drivers | USB-to-serial drivers installer package for 32 and 64-bit versions of Windows XP (32-bit only), Vista 7, 8, 8.1 and 10. This package contains four drivers. The first and fourth drivers are for the Opticon cradles. The second driver is for the OPN200x scanners along with many other Opticon products. The third driver is an ATEN driver for a popular RS232 <-> USB-VCP adapter. You can choose any of the drivers to install on the first screen of the installer program. *Note: Opticon USB Drivers may not install or operate correctly if FIPS (Federal Information Processing Standards) is enabled on your host computer* | 1.615 | Download |