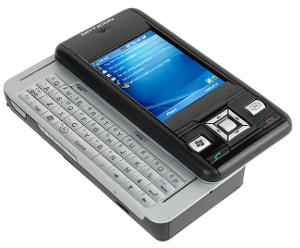
H16
Downloads
| Notice |
| The downloading and use of any Opticon software implies consent with Opticon's End User License Agreement. |
Software
| Platform | Description | Download |
|---|---|---|
| Firmware: OS - REL_IRIS_081007_FLASH.BIN - SD Method | This is the Windows Firmware for the H16. See the Upgrading section for installation instructions. | Download |
| Firmware: OS - FUU_v23.44_REL_IRIS_081007.exe - ActiveSync/Windows Mobile Device Center Method - Windows XP | See the Upgrading section for installation instructions. | Download |
| FL23J12 - This is the Firmware for updating the MDI1000 scan engine inside of the H16B scan Engine. Use MDI1000 firmware version FL23J12. Do not use newer versions. | See the Upgrading section for installation instructions. | Download |
Factory Reset Instructions
How do I soft-reset the device?
- Use the stylus to press the reset button on the side of the device
How do I hard-reset the device?
- Soft-reset the device, press and hold the power button for 10 seconds, then release it. You should see a blue screen, press the 'left' key to format user store. You will need to realign the screen if you did it correctly. You can also go to Start -> Settings -> System (tab) -> Factory Reset.
Using the H16
Enabling the Barcode Scanner
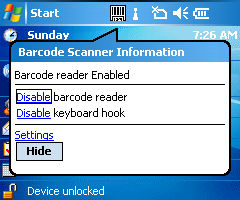
First, tap the barcode icon at the top of the screen. The dialogue pictured at right will appear. There are two options on this dialog, "barcode reader" and "keyboard hook," which both have to be enabled for the barcode scanner to read barcodes into text fields in applications.
Seeing the word "Disable" in blue next to both items indicates that they have been enabled.
Using the Barcode Scanner
To use the Barcode Scanner, open your application, tap the field where you want barcode data to go, and scan your barcodes. If the barcode scanner is configured properly the data will be entered into the field.
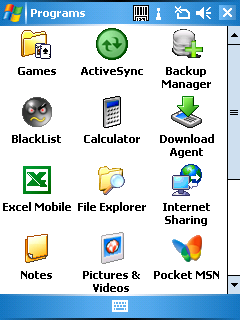
A useful application to collect barcode data in is Excel Mobile, as the data can be made accessible to a host computer using Activesync. You can reach Excel Mobile by tapping 'Start'->'Programs' and then double-tapping 'Excel Mobile'.
Upgrading
The latest OS for the H16 can be found in the above software table.
OS Update Instructions
ActiveSync Method
Step 1: Prepare for upgrade
-
- Install a good battery with at least 30% capacity
- Follow the Setup Wizard until you see the Home Screen
- Connect the H16 using the USB cable and wait for Activesync to start and connect; you can cancel the PC Sync screen
Step 2: Start the upgrade utility
-
- Double click the upgrade utility file name (or the shortcut on your desktop)
- Check the box that says you have understood and completed the above steps
- Click 'Next' to continue
- Click 'Next'
- At this point the H16 should be writing data to its memory and will display progress on the screen. Do not remove the battery or the USB cable until the device has finished writing data. Wait until you see the H16's Home Screen that asks you to 'Tap the screen to set up your Windows Mobile based Device'.
Step 3: Set up the H16 after upgrade
-
- Tap the screen to start the Setup Wizard; follow the same steps as in Step 1.
- Follow the wizard until you get to the home screen
Step 4: Confirm the update
-
- Tap 'Start' -> 'Settings' -> 'System' -> 'Device Info'
- Verify that the ROM version has changed to the new version
Step 5: Set regulatory region to US
-
- Tap 'Start' -> 'Settings' -> 'Connections' -> 'Wireless Manager'
- Tap 'Settings' in the lower right corner
- Tap 'Regulatory'
- Select 'United States' from the drop down list
- Tap 'Save'
Flash Card Method
Step 1: Prepare for upgrade
-
- Install a good battery with at least 30% capacity
- Connect to USB charger. A Windows sync or connection is unnecessary.
- Download the latest OS flash image from the above software table (Note: it is in the zip file without a Windows OS name)
Step 2: Transfer image
-
- Unzip and copy the image file onto the root of a blank, formatted mini SD card.
- Insert card into H16 device
Step 3: Perform upgrade
-
- Soft reset the device, press and hold [VOLUME DOWN] + [RECORD]
- A Bootloader screen will appear with a set of options.
- Extend keyboard and choose option 6: Update from miniSD
- On next screen choose option 4: Update Kernal Image
Step 4: Wait
-
- The Update process will proceed through 2 progress bars.
- At conclusion device will boot and prompt for initial setup.
Step 5: Make sure the bootloader is the latest one
-
- Perform an upgrade as described above.
Step 6: Confirm
-
- Navigate to 'Start' -> 'Settings' -> 'System' (tab) -> 'Device Info' (icon)
- ROM Version should reflect new OS version
Step 7: Set regulatory region to US
-
- Tap 'Start' -> 'Settings' -> 'Connections' -> 'Wireless Manager'
- Tap 'Settings' in the lower right corner
- Tap 'Regulatory'
- Select 'United States' from the drop down list
- Tap 'Save'
Updating the H-16B's MDI1000 Scan Engine
- Copy the following file into the H-16 using Active Sync.:FL23J12
- Go to 'Start' =>'Settings'. Double Tap on 'Barcode Settings'
- On the bottom tabs, select 'Firmware'. This will take you to the MDI firmware upgrade screen.
- On 'Select Firmware File', select FL23J12 :Input Password is 1234567890AB. Select Start.
Updating the H-16B's MDI to decode Intelligent Mail Barcode- IMB
Procedure:
1. Copy the following files into the H-16 using Active Sync.
- MDI1000_FL23J08_Multilabel.Bin
- OPI2002_FL30J01i_Multilabel.Bin
2. Go to 'Start' =>'Settings'. Double Tap on 'Barcode Settings'
3. On the bottom taps, select 'Firmware'. This will take you to the MDI firmware upgrade screen.
- First, we will upgrade the MDI software. After this, we will load OPI2002_FL30J01i_Multilabel.Bin
4. On 'Select Firmware File', select MDI1000_FL23J08_Multilabel.Bin
- Input Password is 1234567890AB. Select Start.
5. After upgrading the MDI1000, follow step 4 but on 'Select Firmware File', choose OPI2002_FL30J01i_Multilabel.Bin
- Input Password is 1234567890AB. Select Start.
Enable the IBM Symbology
By default the IMB Symbology is disabled. The command line to enable the IMB is BJT. Since it is a 3 characters command, we will send [BJT
1. Go to 'Start' => 'Settings'. Double tap 'Barcode Settings'.
2. On the bottom taps, select 'Menu Codes'.
3. Tap on 'Edit'.
4. A Word File opens. Under RZ1M, write the command line [BJT . Click 'OK' and close the window.
5. Select 'Update' to send the new command to the MDI. You should a message acknowledging that the command was successful.
Factory Reset
A factory reset can be performed that will reload Windows Mobile into a 'Vanilla' state. This will require that all data and customer applications are reinstalled after the factory reset is complete. There are two ways to perform a factory reset.
Process 1:
-
- Navigate to 'Start' > 'Settings' > 'System' (tab) > 'Factory Reset' (icon)
- Type '1234' as instructed by the on screen directions.
- Tap 'Yes'
- Note: This process will only delete User Store and will not touch DiskOnChip.
Process 2:
-
- Using the standard stylus press and release the reset switch on the left side of the unit.
- Press the power switch or connect the device to external power. It will begin to boot.
- Before the Opticon Logo screen appears begin holding the power button.
- After a few seconds a blue screen will appear with the following options:
***SYSTEM COLD BOOT***
1 Left Key to Format User Store
2 Right Key to Format DiskOnChip
3 Up Key to Format User Store and DiskOnChip
The Other Key to Exit.
-
- You have 5 seconds to make a selection. The keys it refers to are the direction keys on the face of the device between the Windows flag button and the OK button.
- Note: These keys can be difficult to press correctly when hurried.
- The next blue screen will be a confirmation of your selection. Use the left or right soft keys (just below the display) to choose 'Yes' or 'Cancel'.
- The Opticon Logo screen will appear and the device will continue to boot. It will take longer this time than normal and when complete you will see the Windows Mobile initial setup screen.
Internet Connection Setup
These instructions step you through setting up internet connections on the H16 through your cellular carrier.
- Install SIM card with valid Data plan
- Your cellular account must have a valid data plan activated for internet connections to function on the H16. Contact your carrier for details.
- The SIM card must be installed under the battery of the device.
- Power on your device
- Enable Phone
- Navigate to Start > Settings > Connections > Wireless Manager
- If the Phone button is OFF tap it once to turn it ON
- Tap OK
- Remove any preexisting connections
- Navigate to Start > Settings > Connections > Connections
- In the section My ISP find and tap Manage existing connections
- Note: If no preexisting connection exist this entry will not be available. Please skip to Step 4.
- Once for each connection listed tap and hold the line and select Delete from the popup menu. Tap OK when complete
- Add New Connection
- Navigate to Start > Settings > Connections > Connections
- In the section My ISP find and tap Add a new modem connection
- Choose whatever name you wish for the connection
- Under Select a modem choose Cellular Line (GPRS) and tap Next
- Enter the Access point name for your carrier (ATT: wap.cingular, T-Mobile: wap.voicestream.com) and tap Next
- Note: The Access point name can differ from region to region. Contact your carrier if the above suggestions do not work.
- The User name, Password, and Domain fields are left blank. Tap Finish
- Complete
Links
Menu Codes
Menu Codes is the term Opticon uses to indicate a barcode or number/letter combination that has special significance to our barcode scanners. Nearly all of Opticon's products use the same set of menu codes for all possible configuration options. In the case of the H16, many of these options are expressed as buttons and drop down boxes on the various tabs of the Scanner Settings program as described above. A few options, notably those categorized as Data Wizard options must still be configured manually. These menu codes, when known, are placed in the flat text file Initbcr.bcr as described above. The Data Wizard is a series of Menu Codes that allow for basic string manipulations such as removing or replacing certain characters within the barcode data or only transmitting certain portions based on matching criteria. Please Contact Us for additional details on these features. A specific example of these codes (used to remove a possible 18th digit from a normally 17 digit VIN) and instruction in their use can be found below.
How do I strip out the 18th digit from Vehicle Identification Numbers (VINs)
- Navigate to Start > Settings > System (tab) > Barcode Settings > Menu codes (tab).
- Tap 'Set Defaults' then 'yes' when prompted.
- You will receive the message "Transmit Command Success'. Tap 'ok'.
- Enable the Barcode Reader
- Tap the 'Options' tab at the bottom of the screen.
- Check the box that says 'Barcode reader: ? Enabled.
- Tap OK in the top right hand corner of the screen.
- Return to 'Barcode Settings' > 'Menu codes' (tab).
- Tap 'Edit'.
- Tap 'View' at the bottom left of the screen and then tap 'Wrap to Window' so that the check mark is removed.
- the text "RZ1M" is present by default. Go to a new line and type the following exactly as you see it here:
[A00[A0W[A0ZQ1Q8[A12Q0Q00I[A14Q0Q1[A1CQ0Q0[A1L[A18[A1F
[A01[A0W[A0ZQ1Q8[A12Q1Q70B[A14Q0Q0[A1CQ0Q1[A1L[A18[A1F
- Tap 'ok' to save the text file
- Tap 'x' to close Word Mobile.
- Tap the button 'Update'. Select 'Yes' when you are prompted.
- You should now again see the message 'Transmit Command Success'.
- Tap 'ok' to close the message.
- Tap 'ok' to close the Barcode Scanner Settings.
- Tap 'x' to close the Settings window.


